How to Add Your Students to the Edneed LMS
The products that are there to ease your life, need to be handy and easy to use. Edneed is a solution for all the requirements of your institute. From private domain to website to Learning management system, you name it, Edneed got you covered.
We have started a chain of blogs to guide us through our learning management system. It will make you handy about our product. You can check them with the links below:
1. How to Create and Grade Assignments in Edneed LMS
2. How To Add Faculty of Your Institution to Edneed LMS
Now, as you have already created your account, integrated your institution, and added your faculty to the Edneed LMS. There are still a few steps left for the complete integration of your institution. The next step of which is adding the most important elements of your institution, students.
Step by Step guide to add Students to the Edneed system
After logging in with your admin credentials, you will land on the admin dashboard. For adding students, you will need to click on the Students button. Since no students have been invited yet, it will lead you directly to the “Invite Students” page.

- Here, you can add up to 10 students manually by filling in the necessary details asked. That includes email, student’s full name, admission number, contact number, and classroom. You can add up to 10 students for a manual invitation by clicking the Invite more button.
- After filling up the details click on “send invitations”. As soon as you hit the send invitation button, students will be notified via email generated by Edneed.
- However, you can also invite students in bulk with the bulk invite option. There’s a pre-decided template for the bulk invite. You can find that in the excel sheet provided in the Invite Students window.
- Download the excel sheet.
- Fill in all the details required like admission no., full name, email, course, contact, and country-code for every student manually.
- Save the Excel sheet.
- Visit the website again and upload the excel sheet.
- After uploading, if it shows any error message, click on the download excel sheet button. Open the newly downloaded excel sheet. It will show the main reason for the error.
- After doing the needful correction, save the file and upload it again.
- If everything is up to the mark, it will be uploaded. Once it is uploaded successfully, every student on that list will receive an email invitation generated by Edneed.
- After students accept the invitation, they will all be listed in the Students window.
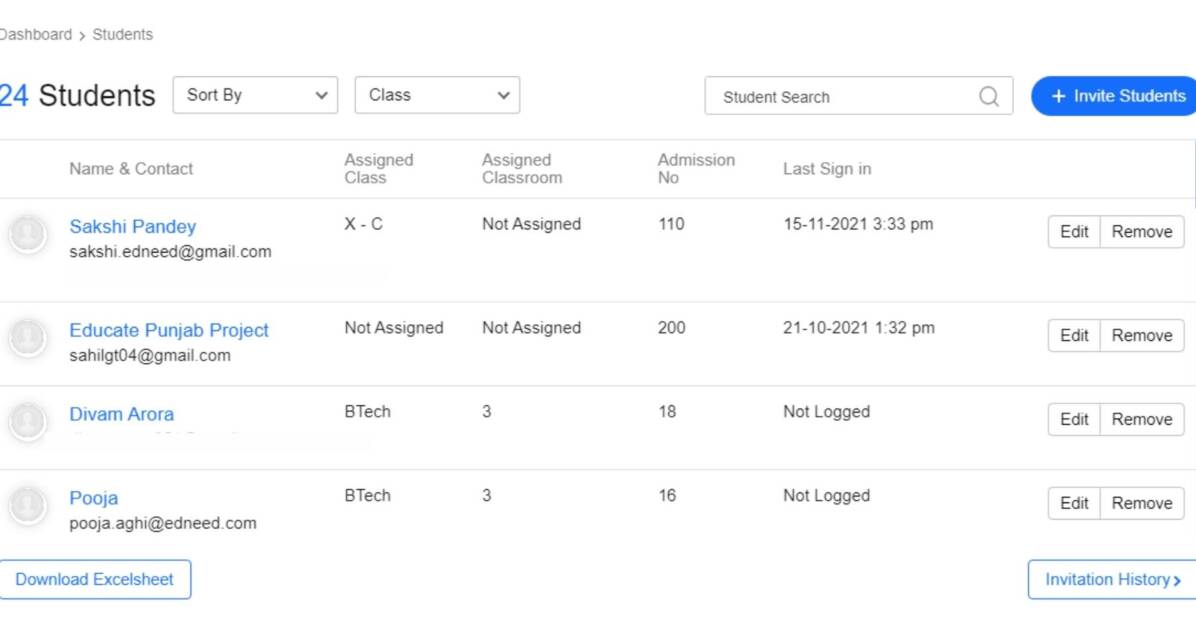
- Admin can see the details of every student listed there. And also can remove them by clicking on the remove button.
The edit button in the students’ list section
- To view the complete detail of a student, the admin can click on the edit button of that student from the list.
- It will open the edit window.
- This window has two options: 1. Personal details 2. Class
- The personal details window consists of information like name, email, contact and Whatsapp number, gender, DOB, parent details, and full address.
- When you click on the class button, a new window will open.
- From this window, you can select as well as edit the pre-assigned class. You can also select the classroom/subjects for that student.
- If students are already assigned to a class, they will receive reminders of scheduled classes for that subject/classroom.
- Once you’re done with the invitation part, visit the students’ window again. You can see two options: 1. Download Excel Sheet 2. Invitation History
- When you click on the download excel sheet button, an excel sheet will be downloaded with all the details of students. It will consist details of their login
- The second option is invitation history. When you click the button, a new window will open.
- In this window, you will get to know about the students who have logged in or have not logged into the system yet.
Admin can see the students who have not logged into the system and get an option to resend the invitation or delete the student from the list.
Conclusion
From managing the institutes to conducting online classes and taking assignments as well as online tests, Edneed is providing every possible digital solution an institute needs. As soon as the teacher schedules an online class, all the students get an email and WhatsApp notification regarding the timing and platform on which the class is scheduled. Teachers can use two different platforms, i.e. Google Meet and Zoom to conduct online classes.
Students and teachers get the best user experience. Edneed is designed in such a way that learning can go on with minimal effort. When they don’t have to do many technical tasks, learning can be effective.


Very Informative!!